I will post a sequence of 6 steps of my Exercise 2 provided at last year's AU. It will show you how to create a custom entity inside AutoCAD 2007 using ObjectARX 2007 and Visual Studio 2005.
Hope you enjoy these posts!
Creating a Custom Entity – Exercise 2 – Step 1
You will learn in this exercise how to create a simple custom entity. I will keep it simple as much as I can to reinforce the basic concepts involved. On the next steps we will improve this custom entity by adding great features step by step.
The first step is to name our entity and choose from which base class it will derive. Remember we have to split our application into two modules, an ARX (user interfaces) and a DBX (the custom entity class itself). These two projects will be placed into the same Visual Studio Solution and the ARX module will depend on DBX module. The names will be:
- Solution: Exercise2 (Visual Studio will create a Exercise2.sln file);
- DBX Project: AuCustomObjects (Visual Studio will create a AuCustomObjects.vcproj file);
- ARX Project: AuUserInterface (Visual Studio will create a AuUserInterface.vcproj file);
Open Visual Studio, go to the menu File > New Project… Open “Other Project Types” node, click on “Visual Studio Solutions” item. It will show a template called “Blank Solution”. Choose this template and name it as Exercise2 (the location can be any folder you want). Click OK to proceed (Figure 8).
Next, right click the solution icon; select Add and then New Project…, (Figure 9). The dialog, presented on Exercise1 will appear. Select on the list the ObjectARX template and create both AuUserInterface and AuCustomObjects modules. Remember to choose ARX or DBX project type accordingly.
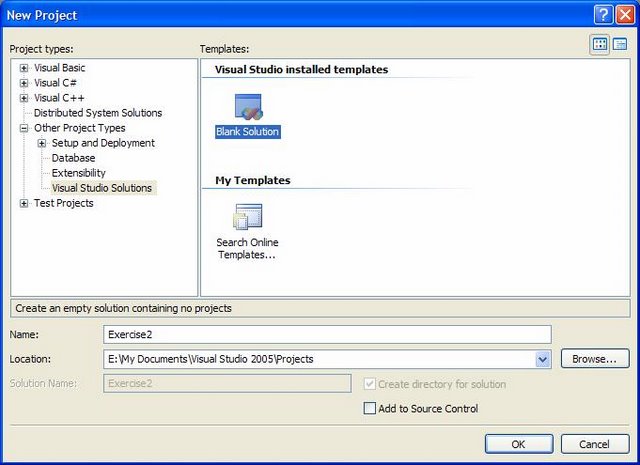
Figure 8 – Blank Solution project
Each project location will be created inside the existing solution by default. Don’t change this location.
Enable MFC option on both projects (don’t need to enable AutoCAD MFC extensions) Enable _DEBUG symbol too. Don’t enable any COM or .NET feature in both projects.
Make AuUserInterface project depend on AuCustomObjects. To do that, right click project AuUserInterface and select Dependencies… Then mark AuCustomObjects project on the list. Click OK.

Figure 9 – Creating solution’s projects
Right click project AuUserInterface again and select “Set as Startup Project” (it will turn to bold). Now test your solution building it: go to menu Build > Build Solution. You should get 2 Builds with 0 errors and (1+3) warnings that are safe to ignore.
The final test at this stage is to load the application inside AutoCAD. Remember our project AuUserInterface depends on AuCustomObjects so the DBX module needs to be loaded first than the ARX module. The unload process must be done in reverse order, AuUserInterface first and then AuCustomObjects. You should get everything working this way.
Note: Depending on which type of build you made (Debug or Release) it is recommended to load both projects with the same compilation type.
Now we have our DBX and ARX module it is time to add our custom entity’s class. In this example, our entity will be derived from AcDbPolyline which represents the AutoCAD POLYLINE entity. The reason for this option is that our custom entity will behave almost exactly like a polyline but it will add some extra features like vertex numbers, direction symbols, hatch, etc. To add this custom class we will use the Autodesk Class Explorer tool which is located at ARXWizard’s toolbar. It is the second button like the Firgure 10 shows.
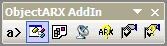
Figure 10 – ARXWizard toolbar
Once you click on this button a dialog bar will appear allowing you to explore all existing classes into your projects. At this time, there are no custom entity classes available. Select our DBX module and then right click on it. A pop-up menu will be displayed. Select the “Add an ObjectDBX Custom Object” option (Figure 11).
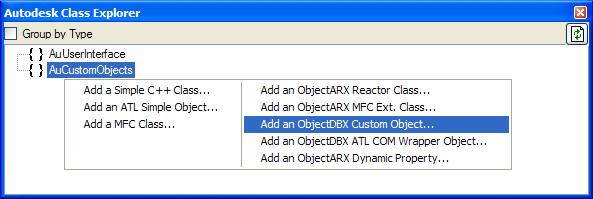
Figure 11 – Autodesk Class Explorer
This wizard has 3 steps. The first step, called Names (Figure 12), allows you to specify all basic custom entity’s features. First, name it as “AuPolyline”. Choose as base class the AcDbPolyline class (note you have several other classes available to derive from). Remaining fields will be filled automatically. Press Next.
Once you select the polyline as your base class you are saying that your custom entity will behave like a polyline except where you redefine it. This is done through the virtual methods I have mentioned before.

Figure 12 – Custom Object Wizard - Names
The Custom Object Wizard also will help you to implement basic class features. This is done on the second step of this Wizard, called Protocols. Enabling these options will instruct the wizard to add the related virtual methods simplifying the class creation process for you.
Inside this dialog you can specify if your entity participate on DWG/DWF protocols, if your entity implements OSNAP points, GRIP points and viewport dependent graphics and, at last, if it implements curve protocols. In this example we will enable only DWG protocol and all 3 AcDbEntity protocols which will allow us to implement some basic features (Figure 13).
The third step, called Advanced, will allow you to add notification and cloning features to your custom entity. In this example we will not use these features. There are many other features you can redefine through a huge set of virtual methods but to keep this example simple we will only implement these ones.
Click Finish to create your Custom Entity’s Class. Remember, it will be placed at you DBX module.
Figure 13 – Custom Object Wizard - Protocols
The Custom Entity Wizard will create default virtual methods but, in this particular case, our base class AcDbPolyline does not support all of these methods signatures. If you compile the solution you will get 4 error messages exactly due that. For now, we will replace the explicit AcDbPolyline:: prefix on these 4 return calls by AcDbCurve:: prefix which is the AcDbPolyline base class. Now you should get no errors.
If you inspect your projects Solution Explorer you will note two new files: AuPolyline.h and AuPolyline.cpp. These files, inside your DBX module, are responsible to declare and implement your custom entity. Open these two files and walk through the generated code.
Now you need to add a new command, inside your ARX module, to create an instance of your new custom entity. To do that, on the Solution Explorer, right click the AuUserInterface project and click “Set as Startup Project” (project name will turn to bold). Now, click on the first icon of ARXWizard toolbar (a icon with “a>” text). This button will open the “ObjectARX Commands” dialog box. It has two command lists. Right click the first list and select New. A new line will be added to this list with a default command called “MyCommand1”. Click OK.
If you open the acrxEntryPoint.cpp file of AuUserInterface project you will find, inside class CAuUserInterfaceApp, the AuUserInterface_MyCommand1() empty method which will be called when you fire MYCOMMAND1 command inside AutoCAD. Inside this method you will create an instance of your AuPolyline entity.
Remember that your custom entity class implementation is located into the DBX project. Due that you will need to add (through #include compiler instruction) a reference to the AuPolyline class declaration file. To do that, add the following compiler instruction at the beginning of acrxEntryPoint.cpp file of your ARX module right after #include "resource.h" line:
#include "..\AuCustomObjects\AuPolyline.h"
The “..\” part of this include path goes up one folder level (getting back to the Solution’s root folder) and then goes into the DBX project folder. Now you can compile your project and shouldn’t get any errors. Next, open AutoCAD, load first the DBX module and then the ARX module (there will be two text messages at AutoCAD command prompt confirming that the both load processes were succeeded. Type your project’s command “MYCOMMAND1” and run a ZOOM EXTENTS command to see the generated entity. If you also run the LIST command and select this entity you will see its detailed information.
The following code will create a 10 sided polyline (closed) and will add it to the Model Space Block Table Record.
// - AuUserInterface._MyCommand1 command (do not rename)
static void AuUserInterface_MyCommand1(void)
{
// AuPolyline entity
AuPolyline* pL = new AuPolyline();
int nSides = 10;
double incAngle = 2*3.141592 / nSides;
// Add vertex list
for (int i=0; i<nSides; i++)
pL->addVertexAt(i,AcGePoint2d(10*cos(i*incAngle),10*sin(i*incAngle)));
// Set Polyline as closed
pL->setClosed(Adesk::kTrue);
// open the proper entity container
AcDbBlockTable* pBT = NULL;
AcDbDatabase* pDB = acdbHostApplicationServices()->workingDatabase();
pDB->getSymbolTable(pBT,AcDb::kForRead);
AcDbBlockTableRecord* pBTR = NULL;
pBT->getAt(ACDB_MODEL_SPACE, pBTR, AcDb::kForWrite);
pBT->close();
// now, add the entity to container
AcDbObjectId Id;
pBTR->appendAcDbEntity(Id, pL);
pBTR->close();
pL->close();
}
Note: You cannot delete the entity’s pointer once it is added to AutoCAD database. In this case its management is delegated to AutoCAD and you only need to call the close() method. If you delete this pointer you will cause AutoCAD to crash.
1 comment :
I know It's a long stretch posting a comment in such an old post but I thought I'd try.
I am trying to run the example in VS2015 (ObjectARX SDK 2018), and some things have changed (i.e. there is no ObjectARX wizard toolbar anymoere etc.). Anyhow, I think I'm doing the steps correctly, however I don't have the compile errors below fig. 13 and so I don't need to replace the AcDbPolyline:: prefix on AuPolyline.cpp source file with the AcDbCurve:: prefix.
However, the linker gives me the following error, and I am completely stuck:
LNK2019 unresolved external symbol "public: __cdecl AuPolyline::AuPolyline(void)" (??0AuPolyline@@QEAA@XZ) referenced in function "public: static void __cdecl CAuUserInterfaceApp::AdskAuUserInterface_myCommand1(void)" (?AdskAuUserInterface_myCommand1@CAuUserInterfaceApp@@SAXXZ) AuUserInterface C:\Users\akosmop\Desktop\ObjectARX_2018_Training\Excercise2\AuUserInterface\acrxEntryPoint.obj 1
Post a Comment