Hello,
On this class we will implement the minimum ObjectARX application without use the ARXWizard. To do that we will need to create the Visual C++ project from scratch and perform some tuning on project settings.
To begin, open your Microsoft Visual C++ .NET 2002. Open File menu, then choose New and New Project. The following dialog will appear (note that this dialog can change a little bit depending on what add-on your have installed):
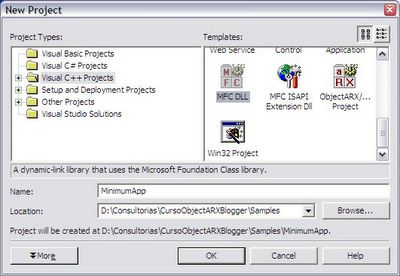
On this dialog, choose
Visual C++ Projects tree node and, on the right portion select
MFC DLL template. After that, specify the name and location you would like to use for this project. Click
OK to continue.
After click
OK the following dialog will be displayed. This dialog has two steps (in this case). The first step, called
Overview, just confirm what you have entered before.
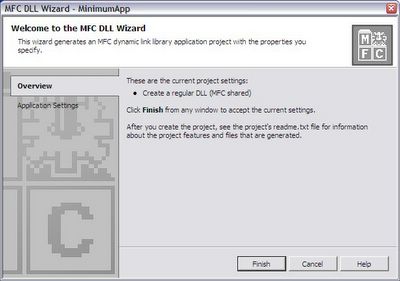
Clicking on the
Application Settings step, the following page will appear inside this dialog:
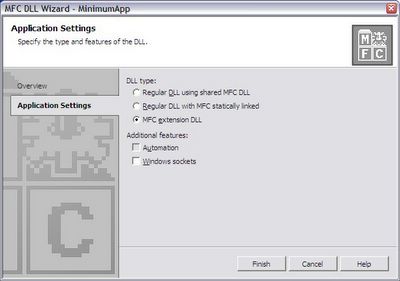
Now we will choose the
MFC extension DLL that is the most adequate DLL type to build ObjectARX applications. Note that the use of MFC is not an obligation. You can build ObjectARX applications without MFC but I strongly recommend you to always use MFC because if you don't need MFC now you probably will need it in a near future.
I would like to avoid more technical discussions on this subject because this is not our focus on this course. MFC is a huge and rich library that will avoid several lines of code and will make your application safe and easy to manage. Click
Finish to continue.
After clicking Finish Visual C++ will create the
MFC DLL project files for you with basic implementation of some features. Remember, this is just a minimum application and we will only make a few things to turn it ready to compile, build and load into
AutoCAD.
The Visual C++ environment is very intuitive and I guess you will not face much trouble to learn how to use it. Basically it has a
project management area (default placed at left side), an
editor area (placed at the right portion) and the
command / monitor area which is placed below. The project management area uses a tab dialog bar to provide tools like
Solution Explorer,
Resource View and
Class View among many others.
Select the Solution Explorer tab and you will see your project files, organized using a tree. This explorer can handle multiple projects but only one can be the default which has its name in bold font.
Now we will need to change some basic settings on our Visual Studio environment to allow us to compile and link ObjectARX application. As I said on previous classes, to build the application, which is a DLL, we will need to compile using the provided ObjectARX headers
(.H files) and to link with ObjectARX libraries
(.LIB files). The easiest way to do this is to change the global Options of Visual Studio. This will affect all projects and you won't need to do this again for new projects.
Open the
Tools menu and select
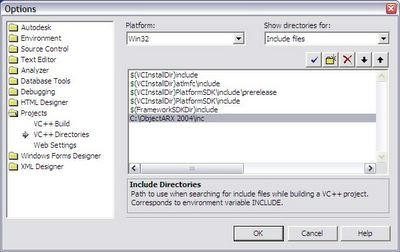
Options (the last entry). The following dialog will appear. Select
Projects and then
VC++ Directories. On the
Show directories for field, select
Include files. Below will appear a list of the include directories that Visual Studio already has and we will add our ObjectARX
inc path which contains the desired .H files.
Click on the folder icon and
click on the ellipsis button and search for the
inc path (in my case, it is placed at
C:\ObjectARX 2004\inc).
 Don't click OK
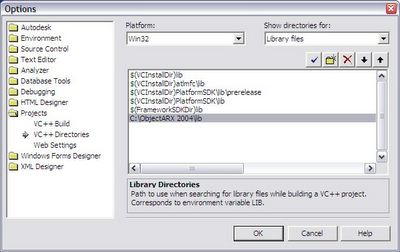
. Now we need to add the library files directory.
Select Library files on the
Show directories for field. Repeat the above procedure to add a path but this time you will add the
lib path (in my case,
C:\ObjectARX 2004\lib). Click
OK to finish.
Now we need to configure our project. This will require some project settings change and some code typing. First, we will change the project settings.
Right click the project name inside Solution Explorer and
select Properties. The following dialog will appear. Select, on the
Configuration field,
All Configurations. This will allow us to change both
Debug* and
Release* settings at the same time.
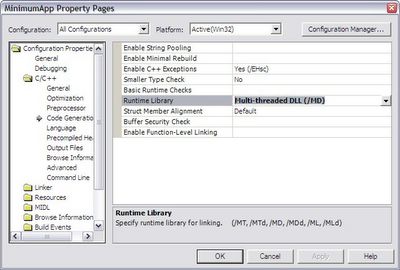
On the
Configuration Properties node, select
C/C++ and
Code Generation. The right portion of this dialog will display a list with several properties. Select the
Runtime Library entry and chance its value to
Multi-threaded DLL. This is a requirement to make our DLL compatible with AutoCAD environment.
Now, select the
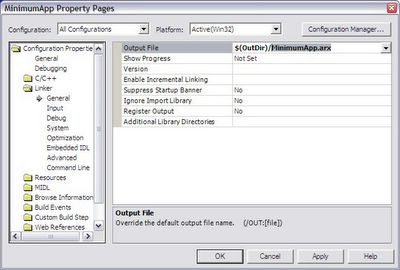
Linker node and
General. On the
Output File entry change the extension name
from DLL to ARX. Note that Visual Studio use several macros (those names with a $ at beginning) to allow easy and flexible path configuration.
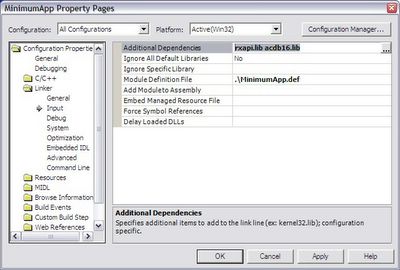
Still inside
Linker node, select
Input. Here we will add those libraries our application will use. This will depend on what features you are using inside your ObjectARX application. In this case, we will add just the basic two libraries called
rxapi.lib and
acdb16.lib.
Select the
Additional Dependencies entry and click on ellipsis button. Type the two previously mentioned files. These libraries are located at
lib folder. Remember that on previous classes I have talked about the features each library has built in.
Click
OK to close Project Properties dialog. Now we still need to do some code typing. The first step is to edit the
DEF file which is placed at
Source Files folder of your project at
Solution Explorer.
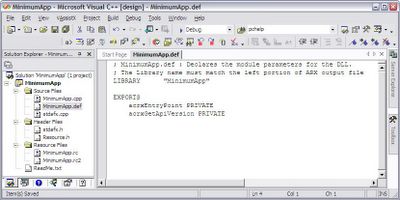
Double click the DEF file and it will appear at the right portion of Visual Studio window. We will need to add the following lines, under the
EXPORTS section of this file:
acrxEntryPoint PRIVATE
acrxGetApiVersion PRIVATE
Pay attention to the name between quotes in front of
LIBRARY section inside this file. This name must be the same name you have entered on the output file. In other words, if your project generates a
ABCD.arx file you need to have
LIBRARY "ABCD" inside the DEF file.
The next step is to change our
StdAfx.h file which is the key compilation file. We will need to inform Visual Studio to use Release version of MFC libraries when our project is being compiled using the
DEBUG directive.
To do that, open the
StdAfx.h file which is located at
Header Files folder inside
Solution Explorer. Before the #include
line, insert the following code:
#if defined(_DEBUG) && !defined(_FULLDEBUG_)
#define _DEBUG_WAS_DEFINED
#undef _DEBUG
#pragma
message (" Compiling MFC header files in release mode.")
#endif
Now, scroll to the end of this file and add the following lines to manage the _DEBUG symbol back and to include basic .H files our application will need:
#ifdef _DEBUG_WAS_DEFINED
#define _DEBUG
#undef _DEBUG_WAS_DEFINED
#endif
// ObjectARX Includes
#include "rxregsvc.h"
#include "acutads.h"
The last step is to add our
acrxEntryPoint method which is our application start point. Open the
CPP file of your application which has the same name that you have set to your project plus the
CPP extension. It is placed inside
Source Files folder. Open if and scroll down to the end. Add the following lines:
// ObjectARX ENTRYPOINT
extern "C" AcRx::AppRetCode acrxEntryPoint(AcRx::AppMsgCode msg, void* appId){
switch(msg) {
case AcRx::kInitAppMsg:
acrxUnlockApplication(appId);
acrxRegisterAppMDIAware(appId);
acutPrintf(_T("\nMinimum ObjectARX application loaded!"));
break;
case AcRx::kUnloadAppMsg:
acutPrintf(_T("\nMinimum ObjectARX application
unloaded!"));
break;
}
return AcRx::kRetOK;
}
Now we are ready to build our application. Open
Build menu and select
Build Solution (or
F7 key). Visual Studio will compile and link and build your project. If you have followed all above steps carefully it will generate the application without any error.
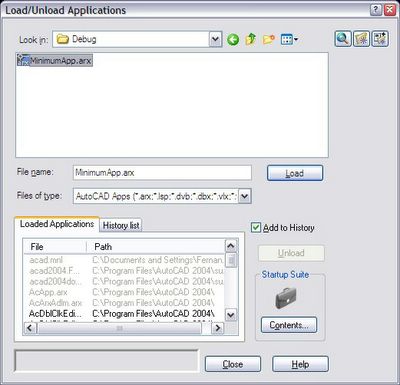
Start AutoCAD and run
APPLOAD command which will show the following dialog. Browse to your project and you will find the application inside the Debug folder which is the default compilation type. Select it and
click Load button. A message will appear at the bottom of this dialog telling you that your ARX was successfully loaded or not!
That's it, your first ObjectARX application is loaded and is running inside AutoCAD!
Next class we will do the same using the ARXWizard. Stay tuned!


