Hello,
I would like to invite all users who not have submitted their applications yet and did not make the registration that both can be done until 15th July.
Regards,
Fernando.
Monday, June 27, 2005
Tuesday, June 21, 2005
AutoCAD 2006 Tips
Hello,
I would like to suggest a link that provides some tips for AutoCAD 2006. Maybe from within this content you may extract a great idea for the Contest Application:
AutoCAD 2006 Tips
Remember, submit your registration by 25th June.
Regards,
Fernando.
I would like to suggest a link that provides some tips for AutoCAD 2006. Maybe from within this content you may extract a great idea for the Contest Application:
AutoCAD 2006 Tips
Remember, submit your registration by 25th June.
Regards,
Fernando.
Monday, June 20, 2005
Contest Registration will close this week
Hello,
Please, remember that our Contest Registration will end on 25th June. Please send your registration form filled out and start to build your sample!
You can be one of the winners and get your full copy of AutoCAD 2006 (not for resale). First place also receives a full license of VisualAssistX.
Regards,
Fernando.
Tuesday, June 07, 2005
Contest registration will open next June 10th
Hello,
The First ObjectARX for Dummies Contest will be officially opened on next Friday (June 10th). By now everyone may download the contest rules here. Please fill this rules form and return to me from June 10th until June 25th.
For those who not have an AutoCAD 2006 version to build and test their samples I would suggest you to download a 30 day evaluation copy of AutoCAD or use one from a friend or your company's computer.
Be creative and explore the new AutoCAD 2006 features!
To be fare with everyone I will limit all support questions to basic features to avoid give any privilege to any contest user.
The winners will be judged by me, Shaan Hurley (from Autodesk) and Lynn Allen (from Autodesk).
Key Dates:
Contest Opens on: 10th June 2005
Last Date for Registration: 25th June 2005
Last Date for Submission: 15th July 2005
Contest Results: 25th July 2005
Good luck to everyone!
Cheers,
Fernando.
Saturday, June 04, 2005
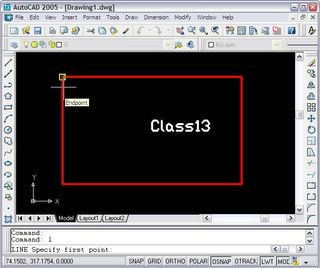
Class 14 - Creating a Custom Entity (step by step)
Hello,
On this class I will complete the Class 13 with a tutorial to show you how to create a simple custom entity step by step. This entity has some features that will help you to see what is possible to do using ObjectARX. Please read carefully the following instructions.
On this class I will complete the Class 13 with a tutorial to show you how to create a simple custom entity step by step. This entity has some features that will help you to see what is possible to do using ObjectARX. Please read carefully the following instructions.
-Create a Blank Solution called CustomEntitySample;
-Add a new DBX project called CustEntityDBX;
-Add a new ARX project called CustEntityARX;
-Remember to enable MFC Extension on both projects;
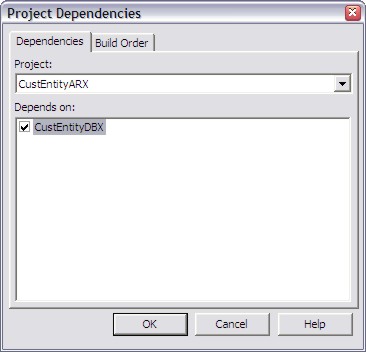
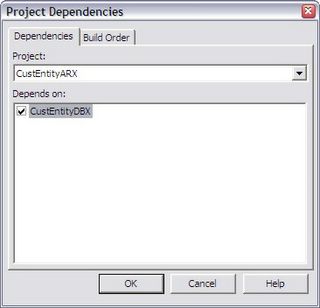
-Create a dependency from ARX project to DBX:
-Add a new DBX project called CustEntityDBX;
-Add a new ARX project called CustEntityARX;
-Remember to enable MFC Extension on both projects;
-Create a dependency from ARX project to DBX:
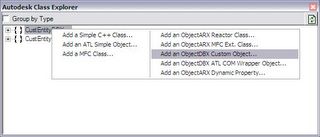
-Go to DBX project and open Autodesk Class Explorer;
-Right click on CustEntityDBX node and select "Add ObjectDBX Custom Object...":
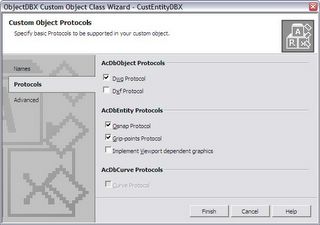
-Choose MyCustomEntity as class name and derive it from AcDbEntity;
-Other fields will be filled automatically (you may change these values);

-Go to the Protocols TAB and enable both Osnap and Grip-points protocols:
-Rebuild your project to see if everything is ok;
-Now, open again the Autodesk Class Explorer, go to CustEntityDBX project;
-Select the MyCustomEntity node (if it is not there, click on Refresh icon);
-Right click on it and select "Add Variable...":

-Name it as "m_PtA", type will be an AcGePoint3d and its access will be protected;
-Enable "Participate to DWG filing protocol", disable "Increase Version number";
-Enable "Implement Get/Put methods" and fill desired comments for it;
-Repeat the process and create : "m_PtB", "m_PtAB" and "m_PtBA":

-Now, add a CString variable called "m_Text";
-Remember to correct the CString manipulation and filing as we have done in Lab3;
-Now you should compile your code ok;

Before continue, we will need to remove some functions that we will not use. First remove the following from .H file:
virtual Acad::ErrorStatus getGripPoints (
AcDbGripDataPtrArray &grips, const double curViewUnitSize, const int gripSize,
const AcGeVector3d &curViewDir, const int bitflags) const;
virtual Acad::ErrorStatus moveGripPointsAt (
const AcDbVoidPtrArray &gripAppData,
const AcGeVector3d &offset, const int bitflags);
There are 4 methods getOsnapPoints(). We will only use the following method:
virtual Acad::ErrorStatus getOsnapPoints (
AcDb::OsnapMode osnapMode, int gsSelectionMark, const AcGePoint3d &pickPoint,
const AcGePoint3d &lastPoint, const AcGeMatrix3d &viewXform,
AcGePoint3dArray &snapPoints, AcDbIntArray &geomIds) const ;
Now, you will need to delete the body of these functions from cpp file.
WORLDDRAW
-To draw our custom entity, we will need to add the following code to worldDraw() method:
assertReadEnabled();
// Bounding Polyline
AcGePoint3d pts[4];
pts[0] = m_PtA;
pts[1] = m_PtAB;
pts[2] = m_PtB;
pts[3] = m_PtBA;
mode->subEntityTraits().setSelectionMarker(1); // Mark 1
mode->subEntityTraits().setColor(1); // Red
mode->geometry().polygon(4,pts);
// Entity's Text
mode->subEntityTraits().setSelectionMarker(2); // Mark 2
mode->subEntityTraits().setColor(256); // ByLayer
AcGiTextStyle style;
style.setFileName(_T("txt.shx"));
style.setBigFontFileName(_T(""));
style.setTextSize(25);
style.loadStyleRec();
AcGePoint3d txtPt((m_PtB.x+m_PtA.x)/2.0, (m_PtB.y+m_PtA.y)/2.0, m_PtA.z);
mode->geometry().text(txtPt, AcGeVector3d::kZAxis,
(m_PtAB-m_PtA),m_Text, m_Text.GetLength(),Adesk::kFalse, style);
return Adesk::kTrue;
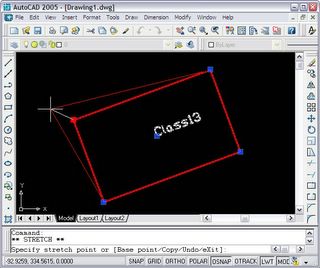
GRIP Points
-Open remaining getGripPoints() method inside MyCustomEntity implementation (cpp);
-We would like to enable 5 grips for this entity. One at each point (A,B,AB and BA) plus one at the center;
-Inside the getGripPoints(), add the following code:
gripPoints.append(m_PtA);
gripPoints.append(m_PtAB);
gripPoints.append(m_PtB);
gripPoints.append(m_PtBA);
gripPoints.append(AcGePoint3d((m_PtB.x+m_PtA.x)/2.0,
(m_PtB.y+m_PtA.y)/2.0,m_PtA.z));
-Now, when user clicks on each Grip we would like to perform an action. This is done using the moveGripPointsAt() method;
-We need to check the index of each fired grip accordingly to the getGripPoints() method and then apply the transformation;
-Inside remaining moveGripPointsAt() method, add the following code:
assertWriteEnabled();
for(int i=0; i<indices.length(); i++) {
int idx = indices.at(i);
// For A and center point
if (idx==0 idx==4) m_PtA += offset;
// For AB and center point
if (idx==1 idx==4) m_PtAB += offset;
// For B and center point
if (idx==2 idx==4) m_PtB += offset;
// For BA and center point
if (idx==3 idx==4) m_PtBA += offset;
}
return (Acad::eOk);
OSNAP Points
-Open the getOsnapPoints() method. We will add 3 Osnap modes: EndPoint, MidPoint and Center:
assertReadEnabled();
switch (osnapMode) {
case AcDb::kOsModeEnd:
snapPoints.append(m_PtA);
snapPoints.append(m_PtAB);
snapPoints.append(m_PtB);
snapPoints.append(m_PtBA);
break;
case AcDb::kOsModeMid:
snapPoints.append(m_PtA+((m_PtAB-m_PtA).length()/2.0)*((m_PtAB-m_PtA).normalize()));
snapPoints.append(m_PtAB+((m_PtB-m_PtAB).length()/2.0)*((m_PtB-m_PtAB).normalize()));
snapPoints.append(m_PtB+((m_PtBA-m_PtB).length()/2.0)*((m_PtBA-m_PtB).normalize()));
snapPoints.append(m_PtBA+((m_PtA-m_PtBA).length()/2.0)*((m_PtA-m_PtBA).normalize()));
break;
case AcDb::kOsModeCen:
snapPoints.append(AcGePoint3d((m_PtB.x+m_PtA.x)/2.0,
(m_PtB.y+m_PtA.y)/2.0, m_PtA.z));
break;
}
return (Acad::eOk);
TRANSFORMATION
-The custom entity transformation is done through transformBy() method;
-Open the Autodesk Class Explorer, expand the MyCustomEntity node, expand Base Classes node and then expand AcDbEntity node;
-Scroll down the list and select:
Acad::ErrorStatus transformBy(const AcGeMatrix3d &);
-Right click on this method and select "Implement Base Class Method";
-This function logic is very simple, just add the following code:
assertWriteEnabled();
m_PtA.transformBy(xform);
m_PtAB.transformBy(xform);
m_PtB.transformBy(xform);
m_PtBA.transformBy(xform);
return (Acad::eOk);
-This function will allow the custom entity to be transformed;
ARX PROJECT
-First we will need to add a new command called "MyCustEnt";
-This will create a method inside acxrEntryPoint.cpp file;
-Now, add the necessary include instruction after the #include "StdAfx.h":
#include "..\CustEntityDBX\MyCustomEntity.h"
-Inside the method we will create our entity:
// Input information
ads_point pt1,pt2;
if (acedGetPoint(NULL,_T("Set the first point:\n"),pt1) != RTNORM)
return;
if (acedGetCorner(pt1,_T("Set the second point:\n"),pt2) != RTNORM)
return;
TCHAR buffer[512];
if (acedGetString(0,_T("Enter the text:\n"),buffer) != RTNORM)
return;
// Setup entity
MyCustomEntity *pEnt = new MyCustomEntity();
pEnt->put_m_PtA(asPnt3d(pt1));
pEnt->put_m_PtAB(AcGePoint3d(pt2[X],pt1[Y],pt1[Z]));
pEnt->put_m_PtB(asPnt3d(pt2));
pEnt->put_m_PtBA(AcGePoint3d(pt1[X],pt2[Y],pt2[Z]));
pEnt->put_m_Text(buffer);
// Post to Database
AcDbBlockTable *pBlockTable;
acdbHostApplicationServices()->workingDatabase()->getSymbolTable(pBlockTable,
AcDb::kForRead);
AcDbBlockTableRecord *pBlockTableRecord;
pBlockTable->getAt(ACDB_MODEL_SPACE, pBlockTableRecord,AcDb::kForWrite);
pBlockTable->close();
AcDbObjectId retId = AcDbObjectId::kNull;
pBlockTableRecord->appendAcDbEntity(retId, pEnt);
pBlockTableRecord->close();
pEnt->close();
TEST
-Rebuild your project;
-Open AutoCAD and load DBX module first and then load the ARX;
-Fire command MYCUSTENT and create as many entities as you want;
-Test it against GRIP edit, MOVE, ROTATE, SCALE;
-Fire a LINE command and try to get precision points (EndPoint, MidPoint and Center) over your entities;
Subscribe to:
Posts
(
Atom
)