Hello,
On this class I will complete the Class 13 with a tutorial to show you how to create a simple custom entity step by step. This entity has some features that will help you to see what is possible to do using ObjectARX. Please read carefully the following instructions.
On this class I will complete the Class 13 with a tutorial to show you how to create a simple custom entity step by step. This entity has some features that will help you to see what is possible to do using ObjectARX. Please read carefully the following instructions.
-Create a Blank Solution called CustomEntitySample;
-Add a new DBX project called CustEntityDBX;
-Add a new ARX project called CustEntityARX;
-Remember to enable MFC Extension on both projects;
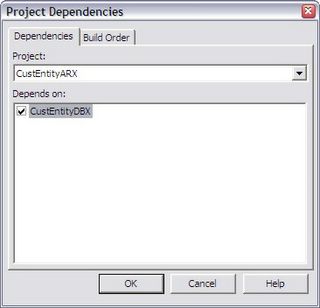
-Create a dependency from ARX project to DBX:
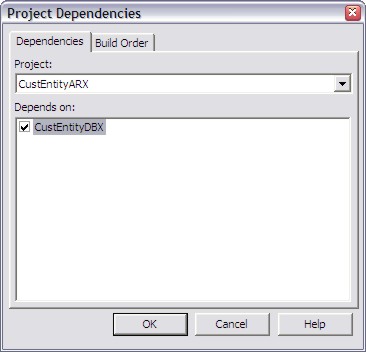
-Add a new DBX project called CustEntityDBX;
-Add a new ARX project called CustEntityARX;
-Remember to enable MFC Extension on both projects;
-Create a dependency from ARX project to DBX:
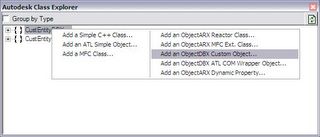
-Go to DBX project and open Autodesk Class Explorer;
-Right click on CustEntityDBX node and select "Add ObjectDBX Custom Object...":
-Choose MyCustomEntity as class name and derive it from AcDbEntity;
-Other fields will be filled automatically (you may change these values);

-Go to the Protocols TAB and enable both Osnap and Grip-points protocols:
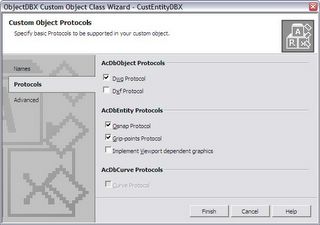
-Rebuild your project to see if everything is ok;
-Now, open again the Autodesk Class Explorer, go to CustEntityDBX project;
-Select the MyCustomEntity node (if it is not there, click on Refresh icon);
-Right click on it and select "Add Variable...":

-Name it as "m_PtA", type will be an AcGePoint3d and its access will be protected;
-Enable "Participate to DWG filing protocol", disable "Increase Version number";
-Enable "Implement Get/Put methods" and fill desired comments for it;
-Repeat the process and create : "m_PtB", "m_PtAB" and "m_PtBA":

-Now, add a CString variable called "m_Text";
-Remember to correct the CString manipulation and filing as we have done in Lab3;
-Now you should compile your code ok;

Before continue, we will need to remove some functions that we will not use. First remove the following from .H file:
virtual Acad::ErrorStatus getGripPoints (
AcDbGripDataPtrArray &grips, const double curViewUnitSize, const int gripSize,
const AcGeVector3d &curViewDir, const int bitflags) const;
virtual Acad::ErrorStatus moveGripPointsAt (
const AcDbVoidPtrArray &gripAppData,
const AcGeVector3d &offset, const int bitflags);
There are 4 methods getOsnapPoints(). We will only use the following method:
virtual Acad::ErrorStatus getOsnapPoints (
AcDb::OsnapMode osnapMode, int gsSelectionMark, const AcGePoint3d &pickPoint,
const AcGePoint3d &lastPoint, const AcGeMatrix3d &viewXform,
AcGePoint3dArray &snapPoints, AcDbIntArray &geomIds) const ;
Now, you will need to delete the body of these functions from cpp file.
WORLDDRAW
-To draw our custom entity, we will need to add the following code to worldDraw() method:
assertReadEnabled();
// Bounding Polyline
AcGePoint3d pts[4];
pts[0] = m_PtA;
pts[1] = m_PtAB;
pts[2] = m_PtB;
pts[3] = m_PtBA;
mode->subEntityTraits().setSelectionMarker(1); // Mark 1
mode->subEntityTraits().setColor(1); // Red
mode->geometry().polygon(4,pts);
// Entity's Text
mode->subEntityTraits().setSelectionMarker(2); // Mark 2
mode->subEntityTraits().setColor(256); // ByLayer
AcGiTextStyle style;
style.setFileName(_T("txt.shx"));
style.setBigFontFileName(_T(""));
style.setTextSize(25);
style.loadStyleRec();
AcGePoint3d txtPt((m_PtB.x+m_PtA.x)/2.0, (m_PtB.y+m_PtA.y)/2.0, m_PtA.z);
mode->geometry().text(txtPt, AcGeVector3d::kZAxis,
(m_PtAB-m_PtA),m_Text, m_Text.GetLength(),Adesk::kFalse, style);
return Adesk::kTrue;
GRIP Points
-Open remaining getGripPoints() method inside MyCustomEntity implementation (cpp);
-We would like to enable 5 grips for this entity. One at each point (A,B,AB and BA) plus one at the center;
-Inside the getGripPoints(), add the following code:
gripPoints.append(m_PtA);
gripPoints.append(m_PtAB);
gripPoints.append(m_PtB);
gripPoints.append(m_PtBA);
gripPoints.append(AcGePoint3d((m_PtB.x+m_PtA.x)/2.0,
(m_PtB.y+m_PtA.y)/2.0,m_PtA.z));
-Now, when user clicks on each Grip we would like to perform an action. This is done using the moveGripPointsAt() method;
-We need to check the index of each fired grip accordingly to the getGripPoints() method and then apply the transformation;
-Inside remaining moveGripPointsAt() method, add the following code:
assertWriteEnabled();
for(int i=0; i<indices.length(); i++) {
int idx = indices.at(i);
// For A and center point
if (idx==0 idx==4) m_PtA += offset;
// For AB and center point
if (idx==1 idx==4) m_PtAB += offset;
// For B and center point
if (idx==2 idx==4) m_PtB += offset;
// For BA and center point
if (idx==3 idx==4) m_PtBA += offset;
}
return (Acad::eOk);
OSNAP Points
-Open the getOsnapPoints() method. We will add 3 Osnap modes: EndPoint, MidPoint and Center:
assertReadEnabled();
switch (osnapMode) {
case AcDb::kOsModeEnd:
snapPoints.append(m_PtA);
snapPoints.append(m_PtAB);
snapPoints.append(m_PtB);
snapPoints.append(m_PtBA);
break;
case AcDb::kOsModeMid:
snapPoints.append(m_PtA+((m_PtAB-m_PtA).length()/2.0)*((m_PtAB-m_PtA).normalize()));
snapPoints.append(m_PtAB+((m_PtB-m_PtAB).length()/2.0)*((m_PtB-m_PtAB).normalize()));
snapPoints.append(m_PtB+((m_PtBA-m_PtB).length()/2.0)*((m_PtBA-m_PtB).normalize()));
snapPoints.append(m_PtBA+((m_PtA-m_PtBA).length()/2.0)*((m_PtA-m_PtBA).normalize()));
break;
case AcDb::kOsModeCen:
snapPoints.append(AcGePoint3d((m_PtB.x+m_PtA.x)/2.0,
(m_PtB.y+m_PtA.y)/2.0, m_PtA.z));
break;
}
return (Acad::eOk);
TRANSFORMATION
-The custom entity transformation is done through transformBy() method;
-Open the Autodesk Class Explorer, expand the MyCustomEntity node, expand Base Classes node and then expand AcDbEntity node;
-Scroll down the list and select:
Acad::ErrorStatus transformBy(const AcGeMatrix3d &);
-Right click on this method and select "Implement Base Class Method";
-This function logic is very simple, just add the following code:
assertWriteEnabled();
m_PtA.transformBy(xform);
m_PtAB.transformBy(xform);
m_PtB.transformBy(xform);
m_PtBA.transformBy(xform);
return (Acad::eOk);
-This function will allow the custom entity to be transformed;
ARX PROJECT
-First we will need to add a new command called "MyCustEnt";
-This will create a method inside acxrEntryPoint.cpp file;
-Now, add the necessary include instruction after the #include "StdAfx.h":
#include "..\CustEntityDBX\MyCustomEntity.h"
-Inside the method we will create our entity:
// Input information
ads_point pt1,pt2;
if (acedGetPoint(NULL,_T("Set the first point:\n"),pt1) != RTNORM)
return;
if (acedGetCorner(pt1,_T("Set the second point:\n"),pt2) != RTNORM)
return;
TCHAR buffer[512];
if (acedGetString(0,_T("Enter the text:\n"),buffer) != RTNORM)
return;
// Setup entity
MyCustomEntity *pEnt = new MyCustomEntity();
pEnt->put_m_PtA(asPnt3d(pt1));
pEnt->put_m_PtAB(AcGePoint3d(pt2[X],pt1[Y],pt1[Z]));
pEnt->put_m_PtB(asPnt3d(pt2));
pEnt->put_m_PtBA(AcGePoint3d(pt1[X],pt2[Y],pt2[Z]));
pEnt->put_m_Text(buffer);
// Post to Database
AcDbBlockTable *pBlockTable;
acdbHostApplicationServices()->workingDatabase()->getSymbolTable(pBlockTable,
AcDb::kForRead);
AcDbBlockTableRecord *pBlockTableRecord;
pBlockTable->getAt(ACDB_MODEL_SPACE, pBlockTableRecord,AcDb::kForWrite);
pBlockTable->close();
AcDbObjectId retId = AcDbObjectId::kNull;
pBlockTableRecord->appendAcDbEntity(retId, pEnt);
pBlockTableRecord->close();
pEnt->close();
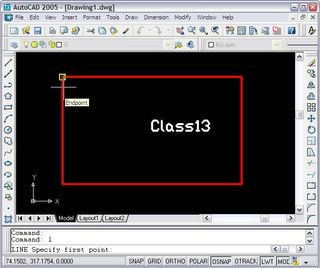
TEST
-Rebuild your project;
-Open AutoCAD and load DBX module first and then load the ARX;
-Fire command MYCUSTENT and create as many entities as you want;
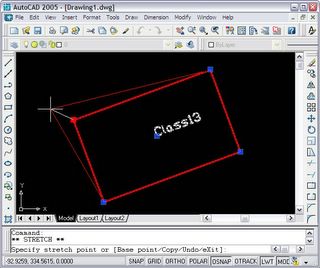
-Test it against GRIP edit, MOVE, ROTATE, SCALE;
-Fire a LINE command and try to get precision points (EndPoint, MidPoint and Center) over your entities;
73 comments :
Hello,thanks a lot for such a good web page about ObjectARX. Very nice tutorials even better than Tutorial of AutoDesk:)))
I stuck in the first step.I am creating the DBX,ARX modules adding dependencies and compiling. I gives such an error:
'CustEntityDBXDLL':undeclared identifier
'InitAdUiDLLL':undeclared identifier
The problem is at the Macro AC_IMPLEMENT_EXTENSION_MODULE(CustEntityDBXDLL) and the in the CustEntityDBX.cpp.
Obviously something wrong with the MFC support???
What do you think the problem is???
Hey thanks to your finished project!! it helped me solve his problem.
There is something wrong with the ARXWizard. It has to add "#include "AcExtensionModule.h" at the end of the "Stdafx.h" file of DBX module. You have to add this at the end after creating your DBX module wşth MFC extension.
Thanks anyways
Hello Mazhar,
Yes, exactly that. ARXWizard is missing this include.
Hope you are doing great and thank you for attending this course.
Regards,
Fernando.
Ok here is my new question how can I add Arrays of points like those above?
When I use a single AcDbPoint3d and use Get/Put functions options while adding variables from wizard, there is no problem. But if I use an array of AcDbPoint3d it gives errors.
So what if we want to use arrays in our custom entity?
Hi Mazhar,
You need to declare a member variable as an AcGePoint3dArray.
It is a dynamic array of AcGePoint3d.
To save, first save the length of this array using length() method then, traverse the array and save each item as AcGePoint3d.
To load, first load the saved lenght then create a FOR statement, read each point and add it to the this array. It is important to zero the array's lengh before adding elements through the FOR statement.
Regards,
Fernando.
I am sorry I meant "dwgIn" and "dwgOut" functions not "get/put" functions.
Hello Firnds.
Can somebody help me? I have problem with "add member variable wizard". It returns mi a javascript error in line 472 col 3. I do not now how to fix this. :( I'm using VS 2005 and objectarx 2007.
Hello,
Please, try to uninstall the ARX Wizard and then install again. Make sure this will be done with all Visual Studio 2005 instances closed.
Cheers,
Fernando.
Hi Fernando,
congratulations for your excellent work!
After creating your CustEntity, what does it take to be able to change for example the text of an existing object through the properties window or by double clicking it?
Thank you in advance,
Panos Mavridis
Structural Engineer,
Chalkis, Evia, Greece.
Hello Panos,
The Properties Palette is implemented through the use of some COM interfaces.
The base class, AcDbEntity, already implement basic features like Layer, Color, etc.
Once you implement your own COM interface it will display the properties as you wish.
Take a look at the Smiley sample and pay attention to the module SmileyDBCom.
\ObjectARX 2008\samples\entity\Smiley\SmileyDbCom
Regards.
Hello Fernando,
Thank you for your amazing Tutorials!
I have some problems?
How can i make my custom entity repond the fillet and chamfer command of autoCAD?
Which functions should i implement ?
Thank you!
sc from china.
Hello sc,
I'm afraid you can't.
These commands has no special method to be implemented.
If your entity derive direct from AcDbEntity these commands will not work but if you derive from AcDbCurve is there a change they will work by default.
The SDK documentation said that you need to override intersectWith() method for the fillet command but this seems to be not what happens in fact.
Regards,
Thank you for your reply!
i have got my entity derived from AcDbPolyline, it works!!!
i hope to copy the AcDbPolyline to my Entity PiAcDbPolyline, i use copyFrom to do it.
but it can't copy the data to my Entity.
How can i do that?
sc.
Hello,
You can override the method:
virtual Acad::ErrorStatus
copyFrom(const AcRxObject* other);
Inside it, do your stuff and pass the call to your base class.
Regards,
Thanks for writing this very useful tutorial!
I have some questions regarding this tutorial:
- Using selection marker is the only way to change sub-item color, linetype and other properties or other way also exists?.
In current sample, we can't capture text(as supposed to do by using selection markers), may be the reason is work not done in this sample to do this! If we want to do so, what event we have to implement?.
- I tried to know what the code insdie getOsnapPoints function is doing by moving custom entity around, but could't find its behaviour!
Check to comment out this also, could't recognize any change in object's behaviour. Please explain it.
Sikander,
The selection marker is necessary to divide your entity graphics allowing you to use different colors, linetypes, layers and more for each part of your drawing. It can be used later through the AutoCAD selection set funtions which will return you the selection marker clicked during the selection procedure.
The getOsnapPoints() method is used to provide precision points from your entity when the AutoCAD demands. This will occur, for exemple, when the user is creating a LINE and approaches your custom entity asking for an ENDPOINT. AutoCAD will call your getOsnapPoints() method passing in the kOsModeEnd as the current request and you just need to fill the array in with the desired points. AutoCAD will take care, using the current appearture, to find out which EndPoint is closer than the current mouse position. As soon as you move the mouse some other points you have provided may turn on/off.
Regards.
Hi(it's Zix again:)).
After creating these two projects I rebuilt it and following error occurred: Error 3 error C2990: 'AcArray' : non-class template has already been declared as a class template c:\objectarx 2005\inc\dbplotsetval.h 36 CustEntityDBX
Any suggestion?
Thanks
Hi Zix,
I suspect the AcArray class may have changed since 2005. Check if you are including the proper file which is "acarray.h".
Also, check if you have some hard-coded definition for AcArray inside your project and remove it using now the ObjectARX one.
Regards.
This is the line where error points:
class AcArray;
So try to remove this (because it is a forward declaration) and use the include:
#include "acarray.h"
Should work.
I have a Custom Object derived from AcDbPolyline. I want an onwership from my CO to a blockreference.
pBlkRef->SetOwnerId() works, but on save of the dwg I get this nasty message:
*Warning* Multiply owned object
How can I get rid of it ?
Hi Mark,
You can't have multiple owners.
If you want to add your custom entity to a block you will need to create the block and add your entity.
Each block is a BlockTableRecord as the ModelSpace is. So the way you build the Block by adding entities is pretty much the same as you did with Model Space.
The only trick is to create a BlockReference refering to this block into Model Space (this is the block insertion) to allow it to appear inside the current drawing.
Take a look at AcDbBlockReference class at ObjectARX docs for further information.
Regards,
Fernando,
my Custom Object is db-resident in the model-space. I now want to "drag" a db-resident blockreference onto my CO and make the CO owner of the BR.
Do you mean I have to create a Blocktablerecord and append my CO and the BR to it ?
Thanks
Mark,
The only solution on this case is to make your CO as owner of this BlockReference is by embedding it as a member of your CO class.
This way, into your worldDraw() you would call its drawing method, dwgIn/dwgOut, transformBy(), etc.
The problem is that you cannot derive from BlockTableRecord and thus create a new block behavior.
Regards.
Hhmm,
what do you mean with "embed" ? There is no such thing as pFiler->writeBlockReference.
The BRs I want to add are very different from each other and I do not want to replicate the standard BR functionality just for establishing a "simple" ownership.
Mark,
Take a look at this example:
http://arxdummies.blogspot.com/2009/05/au2008-class.html
I have embedded the AcDbHatch class into my Custom Entity.
You can do the same with your BlockReferece.
You don't need to call any special method just forward your calls to the embedded object.
pBRef->dwgOutFields(pFiler);
pBRef->worldDraw(mode);
etc...
Regards.
Hi Fernando,
I looked at your example, but unfortunately it does not solve my problem.
You create a hatch and feed it from your AuPolyline data.
My BRs are totally unrelated to my CO data. So I would have to read in all the Attributes etc. and store it with my CO, so that I can rebuild the BR on dwgIn. That's way too much effort.
Mark,
So, gettting back to the major question: Can you make your CO be the owner of a BlockReference? No.
So, the only options you have is to add it as an embedded object OR establish a no-owner relatioship with HardPointers.
So from inside your CO you create a member of type HardPointerId and save it with the BlockReference ObjectId. This way you will have some level of relationship.
Maybe if you explain better what do you want to do I could suggest other approach.
Regards.
Fernando,
thank you for your efforts at first.
At the moment I save the AcDbSoftPointerId of each attached BR with my CO. This takes place in the DBX.
In my "ARX-program" which is written in VB.NET the following scenario happens:
1. The users selects an object in ACAD.
2. I check the type of the object.
3. If it is a BR I want to know if this BR is attached to any of my COs.
4. The user can drag away a BR from a CO. In that case the BR shall remain intact, only the ownership to the CO is removed.
Of course I can walk through all my COs and check whether the BR is pointed to by any of my COs.
But that looks like bad performance.
So I thought an easy solution would be to set the Ownerid of the BR to the "owning" CO. This works well, but gives the unacceptable multiply owned message on save of the dwg.
Mark,
In this case, the best option is to handle this behavior through a Reactor.
An object reactor can be attached to the BR so as soon as it is edited, moved, erased, etc. you can go to your CO and remove the reference.
I can't see any other easier way to accomplish that...
Sorry.
Yes,
I experimented with it. At first in my CO I tried
this->addPersistentReactor(pbr->objectId());
But this does not work :) You have to use
pbr->addPersistentReactor(this->objectId());
Then the CO can receive notifications. This at least gives an indirect object hierarchy.
Alternatively I tried to keep track of my object hierarchy in my VB.NET application. But storing your own data runs you into another general problem:
Whenever you hit ^Z ( = undo) ACAD takes care for you to restore the previous state of your dwg-data. Now you have to design an Undo-history for your own data.
How do you handle this problem ? Is there some general or recommended technique ?
One question on Persistant Reactors:
If I delete my CO do I have to remove all Persistant Reactors for this CO ?
If yes, what happens if I do not ?
Mark,
No, you did it wrong.
You need to create another class to be the reactor and attach it to the BlockReference and your CO.
There is a very good example at the SDK which demonstrate this technique:
\Samples\Reactors\persreac_dg
In this example it attaches the reactor to two different lines linking each other.
I think you can accomplish the same results.
If one of the objects linked is gone the reactor will fail to access the other object.
You can always check if an ObjectId is still valid by calling the IsValid() method.
Hope this help you.
Regarding the AcArray error...
I would avoid including the header. Forward declarations are a better practice when you don't need a comlete type (less dependencies). The only problem in this case is that AcArray is a template with two parameters (not a class). So the forward declaration should look like this:
template <class, class> class AcArray;
Hope you find it useful.
Hello,
Yes, in fact but there is a trick in regards of which version of this class you are using. It provides two quite different internal templates:
template <class T> class AcArrayMemCopyReallocator
template <class T> class AcArrayObjectCopyReallocator
The default is:
template <class T, class R = AcArrayMemCopyReallocator<T> > class AcArray
So I don't know by using your template which version it will use in fact.
Better to use the include because some day Autodesk may change the templates again and you would run the wrong version with unpredictable results.
Regards.
Hi Fernando.
Still, the default template argument of a class template (like AcArray) has no influence on a forward declaration. It doesn't really matter for the forward declaration the type by which the template will be instantiated.
A reason that would cause the code to break is if AcArray changes its interface (for example, taking one more template parameter) in the future. However, if this really happens there are changes that other parts of the code break anyway. Maybe, it would even be better for you to know that AcArray changed. :)
By the way, I forget to say in the first post. Nice blog!
Hi,
I have a custom entity that has to be drawn differently when selected. I have tried implimenting getGripPoints(), but it is const. I also tried AcEdInputContextReactor::endEntsel() to get notified if my entity gets selected, but with no luck. Can anybody help?
Dawie
Hello Dawie,
I can't think an easy way to do that but I would bet there could be some possible solution by using:
AcEdInputPointFilter::processInputPoint()
through the parameter: pickedEntities
Regards,
Fernando.
Hi Fernando,
I am very interesting about ObjectARX lessons. However, all the links to download the samples are missing, such as this link http://files.ofcdesk.com/ThirdParty/files/ObjectARX/VS2005/CustomEntitySample.zip
Could you please give me the links to download sample projects to learn. I appreciate for your help.
Thank you,
Khoa Ho
Khoa Ho,
Yes, all the download links are broken right now.
I'm trying to address this and hope to get it working next week.
Thank you.
Hello Fernando,
Can you please tell me can we prevent (disable) some commands for custom entities, such as Explode. If yes then how?
You are doing a great work. Heard a lot about you for ObjectARX. Keep it up. And thanks in advance.
Regards,
Piyush
Hello Piyush, thank you for contacting me.
Basically you have two options:
1) For those commands bound to specific methods like EXPLODE you just need to implement the method and "do nothing". Once the user fire EXPLODE AutoCAD will call this method and do what you have coded.
2) For those commands not bound or more complex there isn't much to do except by locking the entities before the user select them. This could be done by using a command React which will track the commands you want to block. So, whenever the user fire those commands you capture the start event, move the entities to a locked layer and when the command is either finished or cancelled you put them back the original layer. Be aware also of GRIP editing commands because they fire different reactors.
Hope this help you.
Regards.
Hello Fernando,
I guess that should work.
Thanks for such a fast reply.
Regards,
Piyush.
Hello Fernando,
Can you please tell me how to add any entity (circle for example) into a region.
I tried to get the array of points for circle through EXPLODE api to insert them into region but that's not working.
Thanks in advance
Regards,
Piyush
Piyush,
You cannot add an entity into an existing Region but you can create a new region with your entities then merge with another region.
AcDbRegion class does provide a method for that:
virtual Acad::ErrorStatus booleanOper(
AcDb::BoolOperType operation,
AcDbRegion* otherRegion
);
The THIS entity will be the new one with the merge result. Be aware that this operation may fail if the boolean type requested is not possible.
Hope this help.
Hello Fernando,
I think I did a mistake in explaining to you. I want to explode circle programmatically and then want to get array of points. Here's a sample code that explains what I am trying to do.
AcDbVoidPtrArray curveSegments;
Acad::ErrorStatus hr = cir->explode(curveSegments);
The problem here is that "hr" returns "eNotApplicable" and the AcDbVoidPtrArray is empty. Is there any way to get the array of points of that circle.
Later I will put the array of points in AcDbRegion but that's later. First I should get the array of points through explode() api or some other mechanism.
Thanks & Regards,
Piyush.
Piyush,
You cannot explode a Circle because it is a basic entity. This is the reason you are receiving eNotApplicable as a result error.
What you can do to obtain the points around the circle line is to obtain the parametric points of it. As AcDbCircle derives from AcDbCurve, it is a parametric curve.
So you have methods that return you a point at a specific parameter. With the other methods that return you the start and the end parameters it is just a meter of divide the parameter size by the number of subdivisions you want to calculate the step. Then create a FOR loop incrementing the parameter by the step you calculated previously thus allowing you to get a point at every parameter increment.
With that you can get as many points you want.
Not that this will work for all curves derived from AcDbCurve.
Hope this work.
Fernando,
Thanks for the idea and info. But can you share a sample code snippet for the same.
Thanks & Regards,
Piyush.
Piyush,
Sorry but I don't have any sample for that. It should be very straight forward.
Open the circle for read, get its start and end parameters, calculate the difference. Divide the value by the number of points you want. Create a loop and increment a counter with the step value you calculated before. For each parameter value, get the point with the method getPointAtParam().
Regards.
I created a custom Entity. declare a
AcArray mType;
member array.
When I calling a custom member function. The error occurred on
mType.at(i); refer to isValid(i) in acarray.h.
in further tracing, I discovered that the mType.length() is not a constant value.
What shall I notice to overcome this error? Please help.
Jack,
AcArray is a dynamic array so length() method will return you the current length and not the initial length. Further, some methods like at() are available with a CONST so the object returned buy it is CONSTANT. Also the method at() itself is a CONST in this case and it can't be called by a non constant pointer.
Same behavior for the [] operator. It has a CONST override which will work for constant calls.
Hope this help you.
Regards,
Fernando,
I’m currently trying to derive a custom AcDbPolyline object and access it via VB.net (as shown in the SimpleSquare project) using mixed managed code.
I have everything working fine, but I’m stuck trying to cast the object right before I append it to the database….. In the sample provided they do it
By passing it through an entityjig – making this legal:
m_jigSquare = CType(Entity, MgSimpleSquare)
or
variable=Ctype(Obj as Expression, Object)
so here (as part of a class implanting EntityJig, or because MgSimpleSquare is a derivative of Entity,
the first I think…) Entity is an expression… but I’m not feeding my custom object through a jig, so Entity is a Type in my case!
I’ve tried throwing it left right and center, but to no avail. I’ve created Entities and Polylines and tried casting my object into them,
Tried casting it into itself, but at the end of the day, even though the class seems to be working and stepping through, I’m just not returning any classID for my custom class even though it’s properties and such are saving :*(
Any ideas???
Hello,
I think somebody else has experienced the same issues. Take a look at the comments section of this page into my Blog:
http://arxdummies.blogspot.com.br/2005/04/class-11-custom-objectarx-class.html
There are some other helpful links mentioned in between the messages.
Regards,
Hello Fernando Malard,
I'm Kyle
I created a custom entity in VS2010 - ObjectArx2012, following your instructions.
But, the functions : subGetGripPoints, subMoveGripPointsAt, subTransformBy weren't called.
And, the functions: GetGripPoints, MoveGripPointsAt, TransformBy can't use (I get the error: cannot override sealed function).
I can't understand why...
Could you help me..., give me further guides... Thanks very much...
Hello Kyle,
Autodesk renamed essential overridable methods due some .NET technology (entity overrule) they implemented on ObjectARX lately.
Due that, some methods were renamed by adding "sub" as a prefix.
The project sample you downloaded was created with an old version of ARXWizard so it does not meet these requirements.
I would encourage you to create a brand new project with the 2012 ARXWizard and add the methods you want to override from its handy tools.
For example, worldDraw() is now subWorldDraw(), etc.
This explains why your methods are not being called.
Pay attention also to some method signatures changes once they may slightly change and if you override them with a different set of parameters it would be never called as well.
Good luck.
Thank Fernando Malard...
I did understand.
-Kyle-
I cannot download Download the below links: this sample (VS2002) here!
Download this sample (VS2002 and VS2005) here!
please if possible email me at:
mmkkmmv@yahoo.co.in
Hello,
Sorry about that, I've just updated the links to my Google Drive.
Regards,
Hello, Fernand!
how can i create several entities (labels for a pline)?
Which should be the order code for the database pointers?
I must be close the database in each text entity or after create all?
I can use the same pointer for all?
im confused!
Thanks in advanced...
Hello,
Actually you will instantiate a new pointer to every new entity, post it to the ModelSpace and then call close() on it without deleting the pointer. Remember, once the entity is added to the Database you cannot call delete on it.
So, the basic workflow in this case would be:
- Traverse the Polyline (it is a Parametric Curve class so you can use either parameters or distances to traverse it and get a point at each position you want);
- For each position, using the collected AcGePoint3d, instantiate a new Text class like AcDbText or AcDbMText (for a multiline text);
- Add each text pointer to ModelSpace then call close() on the pointer (remember, once added just close it, don't delete it).
Hope it helps.
Regards,
Hello Fernando I'm doing a custom entity that represents a roof truss and requires adding several 3D solids,I read how to embed an object in the power of ObjectARX, but I wonder what is the best way to add multiple solids to WorldDraw and can make connections and intersections between them, Regards.
Hi Temoc,
Usually solids are the last resource for doing any dynamic 3D drawing.
I'm not sure you can configure your solid while creating the truss bar while creating it and just store the end result inside the custom entity.
You could have a Refresh() like method which will recalculate the solid by demand. If you put the solid creation logic inside worldDraw() it will be called all the time and it will make your AutoCAD crawl.
I believe your challenge is related to how to do add/subtract solids at the beams/columns connection where one element may cut another. So the Refresh() method could analyze its surrounds and calculate the end result.
Anyway, just trying to guess your demand for using solids as embedded objects. I would avoid this at all costs if possible.
If you could better explain your project with practical situations I could better tune my suggestions.
Best regards,
So what is the best resource for doing a dynamic 3D drawing ?, use geometry primitives like shell or mesh ?, what is your suggestion, thanks for the help.
Temoc,
Squared geometry should be feasible through shell (from ObjectARX docs):
A shell is a list of faces that might be connected and can have holes in them. The shell is specified by the number of unique vertices, a list of vertices (pVertexList), the number of faces (faceListSize), and a face list, which consists of the number of points in a given face followed by the index in the vertex list of each vertex for that face. The signature for the shell() function is:
virtual Adesk::Boolean
AcGiWorldGeometry::shell(
const Adesk::UInt32 nbVertex,
const AcGePoint3d* pVertexList,
const Adesk::UInt32 faceListSize,
const Adesk::Int32* pFaceList,
const AcGiEdgeData* pEdgeData = NULL,
const AcGiFaceData* pFaceData = NULL,
const AcGiVertexData* pVertexData = NULL
const struct resbuf* pResBuf = NULL) const = 0;
The problem is how to define the geometry in terms of faces. Take a look at the ObjectARX documentation about the shell() primitive. It is fast, it hides and render quite well in 3D. The missing piece would be physical properties like volume, mass, etc. But if your geometry is simple you can use some raw math science to calculate those properties.
Hope it helps.
Thank you Fernando
hii fernanado,
iam trying to read entities from database and convert it to polyline then create region ..iam unable to create polyline from lines .plz suggest something.
here is ma code...
Acad::ErrorStatus es;
AcDbDatabase *pDb = acdbHostApplicationServices()->workingDatabase();
AcDbBlockTable *pBlkTbl;
pDb->getSymbolTable(pBlkTbl, AcDb::kForRead);
AcDbBlockTableRecord *pBlkTblRcd;
pBlkTbl->getAt(ACDB_MODEL_SPACE, pBlkTblRcd, AcDb::kForRead);
pBlkTbl->close();
AcDbBlockTableRecordIterator *pBlkTblRcdItr;
pBlkTblRcd->newIterator(pBlkTblRcdItr);
for (pBlkTblRcdItr->start(); !pBlkTblRcdItr->done();pBlkTblRcdItr->step())
{
AcDbEntity *pEnt;
//AcDbPolyline *pPoly=NULL;
pBlkTblRcdItr->getEntity(pEnt,AcDb::kForRead);
//AcDbLine *pPoly = AcDbLine::cast(pEnt);
//pPoly = AcDbPolyline::cast(pEnt);
acutPrintf(_T("classname: %s\n"),
(pEnt->isA())->name());
pEnt->close();
pBlkTblRcd->close();
}
//AcDbVoidPtrArray lines;
// pPoly->explode(lines);
// pPoly->close();
// AcDbVoidPtrArray regions;
// es = AcDbRegion::createFromCurves(lines, regions);
AcGePoint3dArray InPoints;
AcDbObjectId polylineID = NULL;
polylineID = createPolyline(InPoints);
// Get the AcDbEntity for the polyline.
AcDbEntity* pPolyline;
AcDbObjectId regionId;
acdbOpenAcDbEntity(pPolyline,polylineID, AcDb::kForRead);
// Create a region using the polyline.
AcDbVoidPtrArray polylineArray;
polylineArray.append(static_cast(pPolyline));
AcDbVoidPtrArray regions;
AcDbRegion::createFromCurves(polylineArray, regions);
AcDbRegion *pRegion = NULL;
pRegion = AcDbRegion::cast((AcRxObject*)regions[0]);
pPolyline->close();
// Add the region to the database.
AcDbBlockTable* pBlockTable;
acdbHostApplicationServices()->workingDatabase()->
getBlockTable(pBlockTable, AcDb::kForRead);
// get model space
AcDbBlockTableRecord* pBlockTableRecord;
pBlockTable->getAt(ACDB_MODEL_SPACE, pBlockTableRecord,AcDb::kForWrite);
pBlockTable->close();
AcDbRegion* regionObj = static_cast(regions[0]);
pBlockTableRecord->appendAcDbEntity( regionId,regionObj);
pBlockTableRecord->close();
regionObj->close();
if( pRegion == NULL)
{
//pPoly->close();
acutPrintf(_T("\nFailed to create region\n"));
return;
}
else
{
acutPrintf(_T("\n created region\n"));
return;
}
// Return the ID of the region.
return ;
}
Hi Karishma,
The approach is correct but the call to AcDbRegion::createFromCurves() may return an error status.
Generally speaking, the Region will fail to be created if curves passed in are overlapped, if the boundary is not closed, if the curves are not lying at the same plane, etc.
Another potential problem is when you pass curves crossing each other. This method won't be able to cherry pick the curves that you expect to go together.
Try to monitor the Acad::ErrorStatus returned by createFromCurves() and check what is being reported when you process it over your DWG sample file.
Regards,
Hello there.
(Sorry, my English is not good, the following text from Google Translate)
I have a question about custom entities.
When I tried to pull a drag "LWPOLYLINE" the grips of the time.
CAD will modify its coordinates, after the completion of the reduction.
I want to implement this method in my custom entity apparently inherited POLYLINE is unable to meet me.
So I would like to ask you, how to achieve this demand?
And when I inherited POLYLINE time, it seems not override "MoveGridPoint". Why.
But other SDK instance can be achieved. But this instance, when I went to pull drag grips, is already does not modify the coordinates
Look forward to your reply. Thank you
Hi,
Try this class material I did sometime ago about creating custom entities deriving from Polyline:
https://docs.google.com/open?id=0By7BVn8vCBxnVjFqWEhwYXpTZW0tVlo5QXhSXzljdw
Note that some methods received "sub" as a prefix name, for example, worldDraw() is now subWorldDraw().
Regards.
Hi Fernando,
I need to attach multiple xData to an entity.
I have an entity pEnt, and the XData I want to attach is "Irregular" and "Solid".
Can you show me how can I achieve this with a small example.
Thanks & Regards
Hi,
XData packages are stored under application names thus allowing multiple apps to store their data into the same object's XData storage.
It is important to define a unique name for your application so you don't take the risk of other company/user create a name equal to yours. Avoid simple names like "mydata", "data", "myapp", etc.
You can find more details about XData on the ObjectARX SDK docs but I don't have a direct sample showing what you need.
Regards,
Him
I'm not able to open Autodesk Class Wizard. How can I open it? I've ObjectARX wizard installed.
Best Regards,
Marco
Hello Marco,
These tutorials are kind of old now.
You should find more useful information here:
https://forums.autodesk.com/t5/objectarx/bd-p/34
Regards,
Fernando.
Post a Comment