Introduction
Hello,
Sometimes you need to have a quick access to your command mainly when this one is about enable/disable something in your software. Using ObjectARX you can easily add a new button to existing AutoCAD Status Bar.
To add this new button to AutoCAD Status Bar we need to derive a new class from AcPane and add our desired appearence and behavior. In this example I will show you how to create a simple ON/OFF button.
How to Begin
Create a new ARX project using ARXWizard. Add a new empty file called MyPane.h and use the follwoing code:
#pragma once
#include "AcStatusBar.h"
class MyPane : public AcPane
{
public:
// ----------------------
MyPane(void)
{
this->SetToolTipText(_T("This is MyPane Button"));
this->SetText(_T(" MyPane [OFF] "));
this->SetStyle(ACSB_POPOUT);
enabled = false;
}
// ----------------------
virtual ~MyPane(void) {;}
// ----------------------
virtual void OnLButtonDown(UINT nFlags, CPoint point)
{
AcPane::OnLButtonDown(nFlags,point);
enabled = !enabled;
CString strLabel;
strLabel.Format(_T(" MyPane [%s] "),enabled ? _T("ON") : _T("OFF"));
this->SetText(strLabel);
this->SetStyle(enabled ? ACSB_NORMAL : ACSB_POPOUT);
AcApStatusBar* pStatus = acedGetApplicationStatusBar();
if (pStatus) pStatus->Update();
}
// ----------------------
virtual void OnRButtonDown(UINT nFlags, CPoint point) {;}
// ----------------------
virtual void OnLButtonDblClk(UINT nFlags, CPoint point) {;}
// ----------------------
private:
bool enabled;
};
In this example we are supporting only the LEFT BUTTON CLICK event. Note that you may support other events too. We have added a bool member to handle the switching between ON / OFF states.
After that we need to add this button when our application starts. Open your acrxEntryPoint.cpp file and add the following include:
#include "MyPane.h"
Now, add a MyPane pointer variable as a member of your application class:
MyPane* pMyPane;
Next, add the following two functions to your application class:
// ----------------------
void AddMyPaneButton()
{
AcApStatusBar* pStatus = acedGetApplicationStatusBar();
if (pStatus) {
pMyPane = new MyPane();
pStatus->Add(pMyPane);
}
}
// ----------------------
void RemoveMyPaneButton()
{
AcApStatusBar* pStatus = acedGetApplicationStatusBar();
if (pStatus && pMyPane) pStatus->Remove(pMyPane);
}
// ----------------------
Finally, we need to call these two functions from inside the kInitAppMsg and kUnloadAppMsg events:
// ----------------------
virtual AcRx::AppRetCode On_kInitAppMsg (void *pkt) {
AcRx::AppRetCode retCode =AcRxArxApp::On_kInitAppMsg (pkt) ;
AddMyPaneButton();
return (retCode) ;
}
// ----------------------
virtual AcRx::AppRetCode On_kUnloadAppMsg (void *pkt) {
AcRx::AppRetCode retCode =AcRxArxApp::On_kUnloadAppMsg (pkt) ;
RemoveMyPaneButton();
return (retCode) ;
}
// ----------------------
That's it. Now if you load your ARX application you will see a new Status Bar Button. Try it to switch between ON/OFF. Cool?
Fernando.
Wednesday, May 17, 2006
Sunday, May 14, 2006
User's Samples and Articles
Hello,
I have created a section at this Blog dedicated to all users that would like to send some samples and articles they want to share.
All articles and samples are supported and are responsibility of its authors.
The first article is from Nikolay N. Poleshchuk, a russian AutoCAD author, about a transparent splash screen.
Feel free to send me your articles and samples.
Regards,
Fernando.
Transparent Splash Screen
Transparent Splash Screen As a Modeless Dialog[1]
We would like the splash screen window automatically disappear e.g. after five seconds period. It would be good if an impatient user could close it by a click in the client area.
Moreover it is interesting for the splash screen to be transparent and we could see the current drawing entities under it. Transparency can be reached by Opacity property of the windows created with Windows Forms.
Create a new ObjectARX project named Book16 with the preferences as in the prevoius project[2].
Add book16 LISP function that would be called as ads_book16 C-function defined in acrxEntryPoint.cpp file (see listing 5.34).
Listing 5.34. The ads_book16 function
// Based on:
// N.Poleshchuk, Chapter 05\Book16\acrxEntryPoint.cpp
// In the book "AutoCAD: Application Development, Tuning and// Customization"
// (BHV-Petersburg Publishing House. Russia, 2006)
// http://poleshchuk.spb.ru/cad/eng.html
//
// ----- ads_book16 symbol (do not rename)
static int ads_book16(void)
{
splash16();
acedRetVoid () ;
return (RSRSLT) ;
}
splash16 will be a managed code function. Add to the project Splash16.h and Splash16.cpp files (declaration and body of the splash16 function) and insert #include "Splash16.h" statement at the beginning of the acrxEntryPoint.cpp file.
The Splash16.h file besides splash16 declaration will contain Wform16 class definition for a dialog box. Code for the Splash16.h file is given in listing 5.35.
Listing 5.35. The Splash16.h file
// Based on:
// N.Poleshchuk, Chapter 05\Book16\Splash16.h
// In the book "AutoCAD: Application Development, Tuning and// Customization"
// (BHV-Petersburg Publishing House. Russia, 2006)
// http://poleshchuk.spb.ru/cad/eng.html
//
#pragma once
#using <system.drawing.dll>
#using <system.windows.forms.dll>
tm->add_Tick(new EventHandler(this,&Wform16::TimerOnTick));
The first timer signal must be emitted in five seconds after start. This signal also must become the last one: the Wform16::TimerOnTick function stops the timer (Stop method is used) and closes the dialog box.
The timer should be stopped (another way is to set false to Enabled property), else after that garbage collector will free the memory used by the timer.
So in our sample the splash screen appears in a modeless mode (that is we may do some drafting in the document while seeing the splash) and disappears if the user clicks it or five seconds pass after start.
If there is a nonzero probability of launching the second copy of the splash screen then it is useful to add to our program the analysis of our splash screen presence in the main memory (it is sufficient to create a corresponding global variable and to check its value).
Event handling
Adding controls to the form and their event handling were considered in the previous section[5] Book16 sample project. Now we will emphasize some moments. For example we will take the Button control which is a button of our dialog box.
In order to add a button to a dialog we must create a new instance of the corresponding class:
Button *bt = new Button();
After this it is possible to set values to the properties, e.g.: Text, Size, Location, BackGroundImage, BackColor, ForeColor, Font etc. The created object is then included into collection of the form controls:
Controls->Add(bt);
Each class is connected with many standard events that could be handled programmatically (your own events can be created too). Let’s mention some of the Button control events:
Each of the selected events must be connected with the handler that is an object of the EventHandler class. Namely this handler calls necessary function if event occurs.
E.g. if we build for the Click event a handler that should call Wform16::OnBtClick function then the statement for the handler creation in the Wform16 form class constructor body will be as follows:
add_Click(new EventHandler(this, &Wform16::OnBtClick));
Just the same in a more modern manner (using overloaded += operator):
bt->Click += new EventHandler(this, &Wform16::OnBtClick);
Some events (for example Paint) have another form of the same thing:
Paint += new PaintEventHandler (this, OnPaint);
The last form looks like adding event handler in C# language (see chapter 7[6]).
Every callback function receives two arguments: pointer to an object whose event was generated and additional event data. For example:
void Wform16:: OnTimerTick(Object *sender, System::EventArgs *ea)
The first argument has universal System::Object* type therefore while applying we must bring it to the necessary type (use static_cast operator, see listing 5.36).
Downloads
http://poleshchuk.spb.ru/cad/Download/Book16eng-2002(AutoCAD2006).zip
http://poleshchuk.spb.ru/cad/Download/Book16eng-2005(AutoCAD2007).zip
English Download page is accessible by link http://poleshchuk.spb.ru/cad/Downloade.htm
[1] N.Poleshchuk “AutoCAD: Application Development, Tuning and Customization”, pp. 449–455.
[2] The previous project was created with ObjectARX Wizard using .NET mixed managed code support. (Author’s note)
[3] They define the size, coordinates and background color of the window. (Author’s note)
[4] Framework Class Library.
[5] Opaque Splash Screen As a Modal Dialog. (Author’s note)
[6] Chapter 7. Fortran, Delphi, C#, VB etc. (Author’s note)
We would like the splash screen window automatically disappear e.g. after five seconds period. It would be good if an impatient user could close it by a click in the client area.
Moreover it is interesting for the splash screen to be transparent and we could see the current drawing entities under it. Transparency can be reached by Opacity property of the windows created with Windows Forms.
Create a new ObjectARX project named Book16 with the preferences as in the prevoius project[2].
Add book16 LISP function that would be called as ads_book16 C-function defined in acrxEntryPoint.cpp file (see listing 5.34).
Listing 5.34. The ads_book16 function
// Based on:
// N.Poleshchuk, Chapter 05\Book16\acrxEntryPoint.cpp
// In the book "AutoCAD: Application Development, Tuning and// Customization"
// (BHV-Petersburg Publishing House. Russia, 2006)
// http://poleshchuk.spb.ru/cad/eng.html
//
// ----- ads_book16 symbol (do not rename)
static int ads_book16(void)
{
splash16();
acedRetVoid () ;
return (RSRSLT) ;
}
splash16 will be a managed code function. Add to the project Splash16.h and Splash16.cpp files (declaration and body of the splash16 function) and insert #include "Splash16.h" statement at the beginning of the acrxEntryPoint.cpp file.
The Splash16.h file besides splash16 declaration will contain Wform16 class definition for a dialog box. Code for the Splash16.h file is given in listing 5.35.
Listing 5.35. The Splash16.h file
// Based on:
// N.Poleshchuk, Chapter 05\Book16\Splash16.h
// In the book "AutoCAD: Application Development, Tuning and// Customization"
// (BHV-Petersburg Publishing House. Russia, 2006)
// http://poleshchuk.spb.ru/cad/eng.html
//
#pragma once
#using <system.drawing.dll>
#using <system.windows.forms.dll>
#include "StdAfx.h"
using namespace System;
using namespace System::Drawing;
using namespace System::Windows::Forms;
void splash16();
public __gc class Wform16: public Form
{
public:
Wform16();
protected:
void OnTimerTick(Object *sender, System::EventArgs *ea);
void OnClick(Object *sender, System::EventArgs * ea);
};
Besides splash16 function prototype the Splash16.h file contains description of a managed class derived from the standard Form class. There are three member functions in the class:
- Wform16 — Wform16 class constructor;
- OnTimerTick — function handling the timer event (timer signal);
- OnClick — function handling the second event (click in the client area of the dialog box).
Splash16.cpp file (shown in listing 5.36) includes all the function implementations.
Listing 5.36. The Splash16.cpp file
// Based on:
// N.Poleshchuk, Chapter 05\Book16\Splash16.cpp
// In the book "AutoCAD: Application Development, Tuning
Listing 5.36. The Splash16.cpp file
// Based on:
// N.Poleshchuk, Chapter 05\Book16\Splash16.cpp
// In the book "AutoCAD: Application Development, Tuning
// and Customization"
// (BHV-Petersburg Publishing House. Russia, 2006)
// http://poleshchuk.spb.ru/cad/eng.html
//
#include "StdAfx.h"
#include "Splash16.h"
using namespace System::Drawing;
using namespace System::Windows::Forms;
using namespace Autodesk::AutoCAD::ApplicationServices;
void splash16()
{
Wform16* pwf = new Wform16();
Autodesk::AutoCAD::ApplicationServices::Application::
ShowModelessDialog(pwf);
}
Wform16::Wform16()
{
// Dialog box parameters
Size = System::Drawing::Size(370, 300);
StartPosition = FormStartPosition::Manual;
Location = Point(300, 150);
BackColor = Color::Aquamarine;
Opacity = 0.5;
FormBorderStyle = FormBorderStyle::None;
// Font
FontFamily *pFf = new FontFamily(L"Arial");
System::Drawing::Font *pFont = new System::Drawing::Font(pFf, 36, FontStyle::Bold);
// Text in the middle of the window
Label *pTxt1 = new Label();
pTxt1->Text = S"Book16";
pTxt1->Location = Point(90, 120);
pTxt1->AutoSize = true;
pTxt1->ForeColor = Color::Black;
pTxt1->Font = pFont;
Controls->Add(pTxt1);
// Handler of the Click event for the form
this->Click += new EventHandler(this, &Wform16::OnClick);
// Timer creation
System::Windows::Forms::Timer *tm = new Timer();
tm->Interval = 5000; // Signal interval
tm->Tick += new EventHandler(this, &Wform16::OnTimerTick);
tm->Enabled = true;
}
void Wform16::OnClick(Object *sender, System::EventArgs *e)
{
// by click close the window
Wform16::Close();
}
// Reaction to the first (and the last) timer signal
void Wform16::OnTimerTick(Object *sender, System::EventArgs *ea)
{
System::Windows::Forms::Timer *t1 =
static_cast (sender);
// Timer stop
t1->Stop();
// Close the window after the first signal
Wform16::Close();
}
splash16 function creates an instance of the dialog class and opens the splash screen window with the special ShowModelessDialog method in modeless mode. The dialog object is deleted as a result of watching two events: Tick (timer signal) and Click (click inside window but not on the text). Standard event list is reviewed in the next section.
Pic. 5.63 shows splash screen of our application over the current drawing background. The window is opened by the LISP expression (book16), entered in the AutoCAD command line.
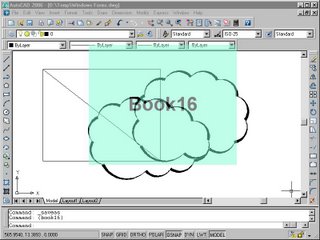
Pic. 5.63. Window with transparent splash screen
This transparent window looks like the window being shown while starting AutoCAD session.
Let’s consider window constructor (Wform16::Wform16 function in the Splash16.cpp file). At first window parameters are being defined. The Size, StartPosition, Location and BackColor properties sense is familiar to us from the previous example[3].
The Opacity property sets the opacity ratio. It can take real values from 0 to 1. When 1 — the window is opaque, when 0 — absolutely transparent (and not seen). We use an average value (0.5).
The FormBorderStyle property is set to None that is a member of the FormBorderStyle enumeration. It means that the window has neither frame nor caption (as the AutoCAD splash screen has).
To place an inscription in the center of the window it is necessary to prepare the font. That is why the FontFamily and Font class instances are created. The font is used in the Label class instance which is added by the Add method to the Controls collection of the dialog.
The next constructor text line adds the Click event handler, that is a click inside the form (but not on the text control having its own Click event):
this->Click = new EventHandler(this, &Wform16::OnClick);
Event handler is an object representing the EventHandler class. Using the above text line we connect the object with a delegate (i.e. pointer to the Wform16::OnClick function). This is the function that will be called if event occured.
The Wform16::OnClick function has a very simple body — only Close method is run. That’s why after click inside the form the splash screen closes.
The last four statements in the constructor create a timer with definite features. The timer that issues signals with some frequency is an object of the Timer class. The FCL[4] classes with the same names exist in three namespaces: System.Timer, System.Threading and System.Windows.Forms. In our Book16 project we chose the last class.
When creating a timer at last the two properties should get their values:
// (BHV-Petersburg Publishing House. Russia, 2006)
// http://poleshchuk.spb.ru/cad/eng.html
//
#include "StdAfx.h"
#include "Splash16.h"
using namespace System::Drawing;
using namespace System::Windows::Forms;
using namespace Autodesk::AutoCAD::ApplicationServices;
void splash16()
{
Wform16* pwf = new Wform16();
Autodesk::AutoCAD::ApplicationServices::Application::
ShowModelessDialog(pwf);
}
Wform16::Wform16()
{
// Dialog box parameters
Size = System::Drawing::Size(370, 300);
StartPosition = FormStartPosition::Manual;
Location = Point(300, 150);
BackColor = Color::Aquamarine;
Opacity = 0.5;
FormBorderStyle = FormBorderStyle::None;
// Font
FontFamily *pFf = new FontFamily(L"Arial");
System::Drawing::Font *pFont = new System::Drawing::Font(pFf, 36, FontStyle::Bold);
// Text in the middle of the window
Label *pTxt1 = new Label();
pTxt1->Text = S"Book16";
pTxt1->Location = Point(90, 120);
pTxt1->AutoSize = true;
pTxt1->ForeColor = Color::Black;
pTxt1->Font = pFont;
Controls->Add(pTxt1);
// Handler of the Click event for the form
this->Click += new EventHandler(this, &Wform16::OnClick);
// Timer creation
System::Windows::Forms::Timer *tm = new Timer();
tm->Interval = 5000; // Signal interval
tm->Tick += new EventHandler(this, &Wform16::OnTimerTick);
tm->Enabled = true;
}
void Wform16::OnClick(Object *sender, System::EventArgs *e)
{
// by click close the window
Wform16::Close();
}
// Reaction to the first (and the last) timer signal
void Wform16::OnTimerTick(Object *sender, System::EventArgs *ea)
{
System::Windows::Forms::Timer *t1 =
static_cast
// Timer stop
t1->Stop();
// Close the window after the first signal
Wform16::Close();
}
splash16 function creates an instance of the dialog class and opens the splash screen window with the special ShowModelessDialog method in modeless mode. The dialog object is deleted as a result of watching two events: Tick (timer signal) and Click (click inside window but not on the text). Standard event list is reviewed in the next section.
Pic. 5.63 shows splash screen of our application over the current drawing background. The window is opened by the LISP expression (book16), entered in the AutoCAD command line.
Pic. 5.63. Window with transparent splash screen
This transparent window looks like the window being shown while starting AutoCAD session.
Let’s consider window constructor (Wform16::Wform16 function in the Splash16.cpp file). At first window parameters are being defined. The Size, StartPosition, Location and BackColor properties sense is familiar to us from the previous example[3].
The Opacity property sets the opacity ratio. It can take real values from 0 to 1. When 1 — the window is opaque, when 0 — absolutely transparent (and not seen). We use an average value (0.5).
The FormBorderStyle property is set to None that is a member of the FormBorderStyle enumeration. It means that the window has neither frame nor caption (as the AutoCAD splash screen has).
To place an inscription in the center of the window it is necessary to prepare the font. That is why the FontFamily and Font class instances are created. The font is used in the Label class instance which is added by the Add method to the Controls collection of the dialog.
The next constructor text line adds the Click event handler, that is a click inside the form (but not on the text control having its own Click event):
this->Click = new EventHandler(this, &Wform16::OnClick);
Event handler is an object representing the EventHandler class. Using the above text line we connect the object with a delegate (i.e. pointer to the Wform16::OnClick function). This is the function that will be called if event occured.
The Wform16::OnClick function has a very simple body — only Close method is run. That’s why after click inside the form the splash screen closes.
The last four statements in the constructor create a timer with definite features. The timer that issues signals with some frequency is an object of the Timer class. The FCL[4] classes with the same names exist in three namespaces: System.Timer, System.Threading and System.Windows.Forms. In our Book16 project we chose the last class.
When creating a timer at last the two properties should get their values:
- Interval — time slot, after which the timer signals; the slot is measured in milliseconds, therefore 5000 value corresponds to 5 seconds of the real time;
- Enabled — timer state; the true value is obligatory to activate the timer object.
tm->add_Tick(new EventHandler(this,&Wform16::TimerOnTick));
The first timer signal must be emitted in five seconds after start. This signal also must become the last one: the Wform16::TimerOnTick function stops the timer (Stop method is used) and closes the dialog box.
The timer should be stopped (another way is to set false to Enabled property), else after that garbage collector will free the memory used by the timer.
So in our sample the splash screen appears in a modeless mode (that is we may do some drafting in the document while seeing the splash) and disappears if the user clicks it or five seconds pass after start.
If there is a nonzero probability of launching the second copy of the splash screen then it is useful to add to our program the analysis of our splash screen presence in the main memory (it is sufficient to create a corresponding global variable and to check its value).
Event handling
Adding controls to the form and their event handling were considered in the previous section[5] Book16 sample project. Now we will emphasize some moments. For example we will take the Button control which is a button of our dialog box.
In order to add a button to a dialog we must create a new instance of the corresponding class:
Button *bt = new Button();
After this it is possible to set values to the properties, e.g.: Text, Size, Location, BackGroundImage, BackColor, ForeColor, Font etc. The created object is then included into collection of the form controls:
Controls->Add(bt);
Each class is connected with many standard events that could be handled programmatically (your own events can be created too). Let’s mention some of the Button control events:
- BackColorChanged — button background color was changed;
- Click — there was a click on the button;
- DragEnter — an object was dragged to the button;
- ForeColorChanged — text color was changed;
- GotFocus — button received focus;
- KeyDown — key was pressed while button had focus;
- MouseDown — mouse button was pressed when cursor was over the button;
- MouseUp — mouse button was released when cursor was over the button;
- VisibleChanged — button visibility state changed (connected with Visible property).
Each of the selected events must be connected with the handler that is an object of the EventHandler class. Namely this handler calls necessary function if event occurs.
E.g. if we build for the Click event a handler that should call Wform16::OnBtClick function then the statement for the handler creation in the Wform16 form class constructor body will be as follows:
add_Click(new EventHandler(this, &Wform16::OnBtClick));
Just the same in a more modern manner (using overloaded += operator):
bt->Click += new EventHandler(this, &Wform16::OnBtClick);
Some events (for example Paint) have another form of the same thing:
Paint += new PaintEventHandler (this, OnPaint);
The last form looks like adding event handler in C# language (see chapter 7[6]).
Every callback function receives two arguments: pointer to an object whose event was generated and additional event data. For example:
void Wform16:: OnTimerTick(Object *sender, System::EventArgs *ea)
The first argument has universal System::Object* type therefore while applying we must bring it to the necessary type (use static_cast operator, see listing 5.36).
Downloads
http://poleshchuk.spb.ru/cad/Download/Book16eng-2002(AutoCAD2006).zip
http://poleshchuk.spb.ru/cad/Download/Book16eng-2005(AutoCAD2007).zip
English Download page is accessible by link http://poleshchuk.spb.ru/cad/Downloade.htm
[1] N.Poleshchuk “AutoCAD: Application Development, Tuning and Customization”, pp. 449–455.
[2] The previous project was created with ObjectARX Wizard using .NET mixed managed code support. (Author’s note)
[3] They define the size, coordinates and background color of the window. (Author’s note)
[4] Framework Class Library.
[5] Opaque Splash Screen As a Modal Dialog. (Author’s note)
[6] Chapter 7. Fortran, Delphi, C#, VB etc. (Author’s note)
Tuesday, May 09, 2006
Using MACROS inside ObjectARX
Hello,
Sometimes is very tedious to create functions to access your custom object members. In some situations we also forget to call the proper assert method before edit or read the variable. This can cause you some trouble later.
I have decided to make a bunch of macros to make our life easier. Using these macros you can speed up your development.
How to use:
First, place the following macros inside a general .H file, say ArxMacros.h, and place it inside your project:
#define _ARX_SGET(x) LPCTSTR Get##x(void) const { assertReadEnabled(); return _s##x; }
#define _ARX_SSET(x) void Set##x(LPCTSTR sValue) { assertWriteEnabled(); _s##x.Format("%s", sValue); }
#define _ARX_IGET(x) int Get##x(void) const { assertReadEnabled(); return _i##x; }
#define _ARX_ISET(x) void Set##x(int iValue) { assertWriteEnabled(); _i##x = iValue; }
#define _ARX_BGET(x) BOOL Get##x(void) const { assertReadEnabled(); return _b##x; }
#define _ARX_BSET(x) void Set##x(BOOL bValue) { assertWriteEnabled(); _b##x = bValue; }
#define _ARX_FGET(x) float Get##x(void) const { assertReadEnabled(); return _f##x; }
#define _ARX_FSET(x) void Set##x(float fValue) { assertWriteEnabled(); _f##x = fValue; }
#define _ARX_DTGET(x) COleDateTime Get##x(void) const { assertReadEnabled(); return _dt##x; }
#define _ARX_DTSET(x) void Set##x(COleDateTime dtValue) { assertWriteEnabled(); _dt##x = dtValue; }
#define _ARX_LGET(x) long Get##x(void) const { assertReadEnabled(); return _l##x; }
#define _ARX_LSET(x) void Set##x(long lValue) { assertWriteEnabled(); _l##x = lValue; }
#define _ARX_DGET(x) double Get##x(void) const { assertReadEnabled(); return _d##x; }
#define _ARX_DSET(x) void Set##x(double dValue) { assertWriteEnabled(); _d##x = dValue; }
#define _ARX_OBJIDGET(x) AcDbObjectId Get##x(void) const { assertReadEnabled(); return _id##x; }
#define _ARX_OBJIDSET(x) void Set##x(AcDbObjectId lValue) { assertWriteEnabled(); _id##x = lValue; }
#define _ARX_PT3DGET(x) const AcGePoint3d& Get##x(void) const { assertReadEnabled(); return _pt##x; }
#define _ARX_PT3DSET(x) void Set##x(AcGePoint3d ptValue) { assertWriteEnabled(); _pt##x = ptValue; }
#define _ARX_PT2DGET(x) const AcGePoint2d& Get##x(void) const { assertReadEnabled(); return _pt##x; }
#define _ARX_PT2DSET(x) void Set##x(AcGePoint2d ptValue) { assertWriteEnabled(); _pt##x = ptValue; }
Go to your custom object's class header and place them as follows:
_ARX_SGET(Name)
_ARX_SSET(Name)
_ARX_DGET(Number)
_ARX_DSET(Number)
_ARX_PT3DGET(Point)
_ARX_PT3DSET(Point)
When you compile the code these macros will expand as follows:
void SetNumber(double dValue);
double GetNumber(void) const;
void SetPoint(AcGePoint3d ptValue);
const AcGePoint3d& GetPoint(void) const;
As they refer to local class variable we need to add them will proper naming convention (note that I put a prefix on each variable inside macros using a letter to identify its type):
CString _sName;
double _dNumber;
AcGePoint3d _ptPoint;
You don't need to place anything else inside your class CPP file. Of course if you need a special behavior when accessing your members you will need to fully create the access function.
That's it, now you have your access functions ready to use.
Fernando.
Sometimes is very tedious to create functions to access your custom object members. In some situations we also forget to call the proper assert method before edit or read the variable. This can cause you some trouble later.
I have decided to make a bunch of macros to make our life easier. Using these macros you can speed up your development.
How to use:
First, place the following macros inside a general .H file, say ArxMacros.h, and place it inside your project:
#define _ARX_SGET(x) LPCTSTR Get##x(void) const { assertReadEnabled(); return _s##x; }
#define _ARX_SSET(x) void Set##x(LPCTSTR sValue) { assertWriteEnabled(); _s##x.Format("%s", sValue); }
#define _ARX_IGET(x) int Get##x(void) const { assertReadEnabled(); return _i##x; }
#define _ARX_ISET(x) void Set##x(int iValue) { assertWriteEnabled(); _i##x = iValue; }
#define _ARX_BGET(x) BOOL Get##x(void) const { assertReadEnabled(); return _b##x; }
#define _ARX_BSET(x) void Set##x(BOOL bValue) { assertWriteEnabled(); _b##x = bValue; }
#define _ARX_FGET(x) float Get##x(void) const { assertReadEnabled(); return _f##x; }
#define _ARX_FSET(x) void Set##x(float fValue) { assertWriteEnabled(); _f##x = fValue; }
#define _ARX_DTGET(x) COleDateTime Get##x(void) const { assertReadEnabled(); return _dt##x; }
#define _ARX_DTSET(x) void Set##x(COleDateTime dtValue) { assertWriteEnabled(); _dt##x = dtValue; }
#define _ARX_LGET(x) long Get##x(void) const { assertReadEnabled(); return _l##x; }
#define _ARX_LSET(x) void Set##x(long lValue) { assertWriteEnabled(); _l##x = lValue; }
#define _ARX_DGET(x) double Get##x(void) const { assertReadEnabled(); return _d##x; }
#define _ARX_DSET(x) void Set##x(double dValue) { assertWriteEnabled(); _d##x = dValue; }
#define _ARX_OBJIDGET(x) AcDbObjectId Get##x(void) const { assertReadEnabled(); return _id##x; }
#define _ARX_OBJIDSET(x) void Set##x(AcDbObjectId lValue) { assertWriteEnabled(); _id##x = lValue; }
#define _ARX_PT3DGET(x) const AcGePoint3d& Get##x(void) const { assertReadEnabled(); return _pt##x; }
#define _ARX_PT3DSET(x) void Set##x(AcGePoint3d ptValue) { assertWriteEnabled(); _pt##x = ptValue; }
#define _ARX_PT2DGET(x) const AcGePoint2d& Get##x(void) const { assertReadEnabled(); return _pt##x; }
#define _ARX_PT2DSET(x) void Set##x(AcGePoint2d ptValue) { assertWriteEnabled(); _pt##x = ptValue; }
Go to your custom object's class header and place them as follows:
_ARX_SGET(Name)
_ARX_SSET(Name)
_ARX_DGET(Number)
_ARX_DSET(Number)
_ARX_PT3DGET(Point)
_ARX_PT3DSET(Point)
When you compile the code these macros will expand as follows:
void SetName(LPCTSTR sValue);
LPCTSTR GetName(void) const;
LPCTSTR GetName(void) const;
void SetNumber(double dValue);
double GetNumber(void) const;
void SetPoint(AcGePoint3d ptValue);
const AcGePoint3d& GetPoint(void) const;
As they refer to local class variable we need to add them will proper naming convention (note that I put a prefix on each variable inside macros using a letter to identify its type):
CString _sName;
double _dNumber;
AcGePoint3d _ptPoint;
You don't need to place anything else inside your class CPP file. Of course if you need a special behavior when accessing your members you will need to fully create the access function.
That's it, now you have your access functions ready to use.
Fernando.
Subscribe to:
Posts
(
Atom
)